Our 3d modeling software has a library of information that can identify standardized items like wide flanges and pipe diameters which helps bridge the CAD integration makes the scan more practical to further any engineering.
An added benefit with the use of Virtual Reality goggles you are able to virtually walk inside the scanned space.
Why 3D Scanning
3D laser scanning uses laser light to create a point cloud of the visible surfaces of an object or space, both short and long range. The scan data from those countless points, in the millions for large areas, is used to create highly accurate 3D CAD models you can manipulate as needed for your project.
3D scanning does away with the imprecision of the rudimentary measurement and visualization tools of yesteryear and offers the ability to create highly precise scans in order to streamline your industrial design process. Be it reverse engineering for product development, product design, facility upgrades or more, 3D scanning services allow you to see the world as it truly is: in 360 degrees, from all angles and down to the millimeter.
No matter the industry you’re in, what you produce or manufacture or the size of your building, industrial 3D scanning services can save you time, money and headaches as well as improve your quality control and deliver peace of mind throughout the entire process.
Precision and Accuracy
Measure twice and cut once as the saying goes and the advantage of 3D scanning is the assurance of that type of precision. Utilizing cutting technology from the beginning ensures another level of accuracy.
Whether you’re scanning small or large objects or let’s say an entire manufacturing plant, for example, the degree to which it’s accurate is crucial to your next steps. With 3D scanning, you’re looking at pinpoint exactitude down to the millimeter depending on how close the scanner is to the object.
More specifically, the degree of accuracy we can achieve with 3D technologies is +/- 2mm over 330 meters.
On top of that, our software has a library of information that identifies standardized items like flanges widths and pipe diameters which helps bridge the CAD integration making the scan even more practical to further any engineering projects.
Ultimately 3D scanning services are squarely about solving a problem, the accuracy of what you’re working with in CAD needs to resemble the real world as closely as possible and there’s arguably nothing more precise.

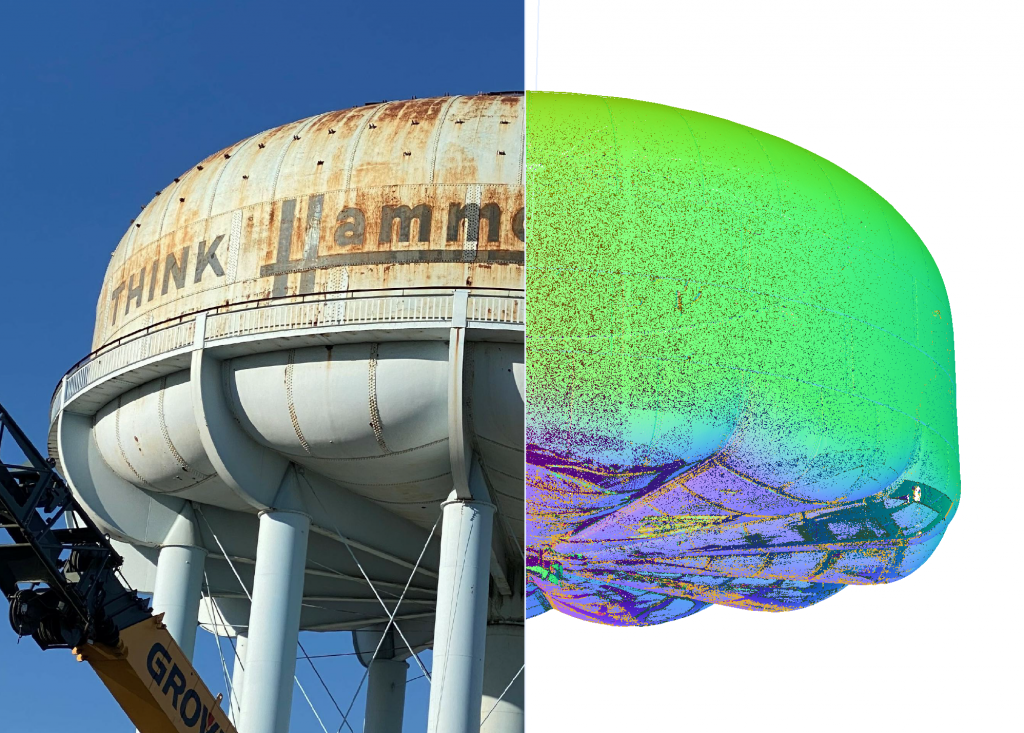
Hammond, IN water tower 3D industrial exterior scan results. With millions of raw data points, you will get a degree of accuracy unattainable by traditional means.
Design, Modeling and Manufacturing
Naturally, having highly refined CAD models to work with is a substantial benefit to your workflow. From design all the way through to manufacturing, the efficiencies and time savings in your process that 3D scanning introduces are hard to overstate.
With more data comes more confidence in your decision making.
Components small or large, 3D laser scanning for industry and industrial engineering brings new dimensions of clarity to your projects.
On a grander, plant-wide scale, we’ve invested in technology that, within a couple of hours, can capture millions of data points to create a virtual rendering of your space. Accurate to ~2mm as mentioned.
Our software is then able to integrate CAD drawings and overlay them into that precise virtual environment using the collected raw point cloud data.
So, if you’re preparing for changes or upgrades to your manufacturing and workspace or new installations to expand capacity and capabilities, facility 3D laser scanning should be an integral part of the planning. Because in addition to the pinpoint accurate renders, with the use of virtual reality goggles you’ll actually be able to walk inside of the scanned space and see how everything fits together.
For industrial plant design, there’s arguably no better tool to map an area.
You’ll know what works and what doesn’t before you move a finger.
Steel Mill furnace elevation that can only be accessed during a shut down was scanned to collect the data for offsite review.
Reverse Engineering and Inspection
Obtaining extremely high accuracy scans of either your facility or a particular part also allows you to dig deep into the details in ways you wouldn’t have been able to before. Inspecting for flaws and issues from all angles and allowing you to elevate the product or design to not just meet quality standards but exceed them.
Furthermore, 3D laser scanning for manufacturing can assist you in situations when you’re perhaps missing a blueprint by allowing you to scan an object and reverse engineer it. In fact, there may be no superior way to achieve that.
Digitizing a part into a 3D model also lets you resourcefully and quickly redesign or modify it if needed.
All in all, 3D laser scanning for manufacturing, design and facilities is a game changer with respect to efficiency and accuracy. With unmatched precision, 3D scanning technology can help you do everything from improve your product development and quality to scan every square inch of your facility so you can smartly expand and enhance your competencies.
Contact us today to find out more
Get in touch with us to find out more about our company and services.
Call Us Now 1800-816-0000
CONTACT USOur Related Service
- Pipe Fabrication
- Tube Fabrication
- Pipe Profiling
- Pipe Cutting
- Tube Cutting
- TKY Joints Fabrication
- Pipe Miter Fabrication
- Pipe Saddle Fabrication
- Pipe Trusses
- Tube Trusses
- Truss Sections
- Pressure Vessel Fabrication
- Pressure Vessel Inspection
- Pipe Welding
- Tube Welding
- Piping Design
- Piping Stress Analysis
- Piping Interface
- Piping Material
- Piping Layout
- Facility 3D Laser Scanning
- 3D Modeling
- New Installation Design
Contact us today to find out more
Get in touch with us to find out more about our company and services.
We serve the Midwest states, including Indiana, Illinois, Michigan, Iowa, Ohio, Missouri, Wisconsin, Kentucky & Minnesota.


